|
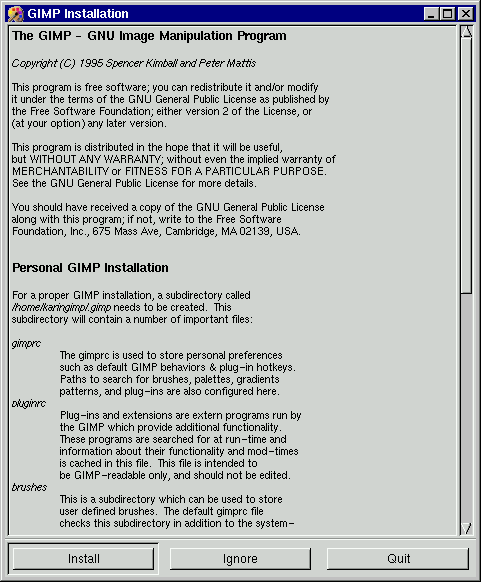
Getting and installing GimpIn this chapter we will tell you how to get a copy of GIMP and how to install it. How to Install the personal files of Gimp.If you are working on a system that already has Gimp installed, say at a campus where you are a graduate: At your Command prompt type gimp and enter. Gimp will fire up some dialogs telling you that it will install some personal Gimp files in you home directory.
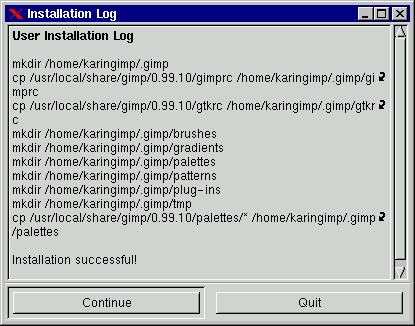
This will bring up a second dialog telling you that all files were successfully installed.
One of the nicest things in Unix is that programs often store personal inifiles and modules in your home directory. This makes it possible to change and add features in the application you are using without having to deal with the system installation of the application. Gimp is no exception to this model. The main drawback on most Unix program is the lack of a GUI to do the adjustments of these files and modules. Gimp has a GUI to some of it's user defined functions, but most of it you have to do in a normal text editor like xedit. You will learn more about this in chapter X. Now lets see what files and directories Gimp has installed in your home directory. The first thing Gimp does is to create a directory named .gimp the dot means that it's a hidden directory, and you have to use ls -a in your terminal window to see it. In this directory Gimp will create three files: gimprc, gtkrc and pluginrc. Some subdirectories are also created. These are brushes, gradients, plug-ins, scripts and tmp. (In 0.99.10 pre3.5 11 Gimp will not create the directory scripts, so if you are in your home directory, execute the following command in your terminal window: mkdir .gimp/scripts). Hmm, so what are all these files good for? gimprc and gtkrc are your personal settings files for Gimp and Gtk. Gtk is the program library that Gimp is using for its GUI and internal API calls. Some of the settings in these files are adjustable in the preference dialog in Gimp, but most of them aren't so you must edit them by hand. In chapter X will you learn about the preference and in appendix X will you learn about editing of these files. pluginrc is a file that Gimp uses to store settings about plug-ins, scripts and other external programs. You should not edit or change this file. You may erase it if Gimp starts a fight with you about this file see Appendix X. The subdirectory "brushes" is where you can store your own personally created brushes. You will learn to make brushes and install them in chapter X. The personal created brushes will then show up in Gimp in addition to the system wide brushes after you have refreshed it in the brush dialog. The subdirectory "patterns" is where you can store your own personal patterns. You will learn more about how to make patterns and how to install them in Chapter X. The personally created patterns will show up in Gimp in addition to the system wide patterns, after you have refreshed it in the pattern dialog. The subdirectory "gradients" is where you can store your own personal gradients. You will learn more about how to make gradients and how to install them in Chapter X. The personally created gradients will show up in Gimp, in addition to the system wide patterns after you have refreshed it in the gradients dialog. The "palettes" subdirectory holds your personal palettes as well as system palettes, if you have edited them. So if you want your system default palette back, you have to rename it or erase it in your personal palette directory. You will learn more about creating, editing and installing palettes in chapter X. The new palettes will show up in gimp when you restart Gimp. In the subdirectory tmp Gimp will store its cache of the image you are working on. Gimp does this to enable undo, and to make it possible to edit large images without consuming too much memory. If Gimp bugs out or something else happens you may find your image here. The plug-ins subdirectory will hold your personal plug-ins which you have created or downloaded from internet. The plug-ins will show up next time you start Gimp. You will learn more about plug-ins in chapter X and in Appendix X you will get a few tips on how to compile them. The script subdirectory will hold your personal script-fu:s which you have created or downloaded from internet. The scripts will show up when you have made a refresh in the Xtns->Script-fu menu. You will learn about script-fus in chapter X and in chapter X you will find some tips and how to's on how to make your own script-fus. The nice thing about all this is if you find any new plug-ins, scrips and so on, you can install them here and don't have to beg your sysadm to install them on the system. We at Frozenriver encourage you to create your own brushes, palettes, gradients, plug-ins and script-fus and to share them with the whole Gimp community. Don't be shy, even small contributes are welcome. You can do this by uploading them at ftp.gimp.org or to the plug-in registry. We at Frozenriver would be happy if you upload them at our website also, so we can make updates in the Gimp manual. By doing this we can also make a binary release of your plug-ins and integrate them to a nice interface in the web, where users easily can download brushes, palettes, patterns, gradients, plugins and scripts. May the spirit of free software be with you or make the GIMP be with you. Installing Gimp if it's not at your systemWhen Gimp 1.0 is released both binary and source distributions to most popular UNIX platforms will be available, but for now only source distributions is available. (Binary distributions for Linux (X86 and Sparc) and Solaris (2.5.1) are available at Frozenrivers ftp site, but these distributions may not be the most updated.). To get the source code you will have to make a FTP session to ftp.gimp.org. The source code is down in directory "/pub/gimp/devel/X.XX.XX" where X.XX.XX stands for the version always grab the latest. In directory "/pub/gimp/fonts" will you find some nice free fonts that you can use in Gimp, see Appendix X how to install them. In directory "/pub/gimp/librarys" you will find some of the libraries that Gimp will need to enable all of it's features. If you are not familiar with FTP can you always use Netscape to do it, or see Appendix X for a brief description. Installing a source distributionIf you have downloaded a source distribution (for binary distributions see next section) you will now have two files; gimp-X.XX.XX.tar.gz and gimp-data-X.XX.XX.tar.gz. You will have to unpack them. Do so by the following command "zcat <gimpfiles> | tar xvvf -" . This creates two directories in your current directory gimp and gimp-data. Change into gimp by "cd gimp". Stop! Stop! we will have to look into what libraries Gimp needs. You will have to have the following libraries or programs:
Now lets begin to build Gimp. First fire up a new xterm by the flowing command "xterm -sl 200 -sb &" in the new xterm do the flowing command "./configure" this will try to locate where all files Gimp needs to compile is located. Now scroll up and see if the configure program didn't find some files ex libtif. If so you will have to tell the configure script where to locate them. You can do this by command line options.
An example would look like this "./configure --disable-debug --with-libtif=/usr/local/lib/tiff/". Now when you are all set and maybe have run your config program a second time, you will have to fire off the make command by "make" enter. This will build your gimp application. If this went wrong you are misfortunated and it's beyond the scope of this book to explain all possible scenarios of what went wrong. But if there was no errors, gimp built okay and it's time to install. To install, do the following command: make -install which by default will install Gimp in /usr/local/bin and all plug-ins in /usr/local/lib/gimp/X.XX.XX and the scripts in /usr/local/share/gimp/scripts. Now it's time to install all data files that were in the gimp-data distribution. Do this by cd into the gimp-data directory and do the following command "./configure ; make ; make -install" which will install the data in to /usr/local/share/gimp. You can of course install gimp in different directories. To do so, read the INSTALL file and apply the command line options specified in the INSTALL file. Now you can jump to the first section in this chapter and read about how to install the personal gimp files. To install a binary distribution.This will be finished when a permanent way of installing binaries is released. [Top] [Prev] [Next] [Bottom] karin@frozenriver.ale.se Copyright © 1997, Karin Kylander |
|||||||||||||||||
|
With any suggestions or questions please feel free to contact us | ||||||||||||||||||