|
Chapter 20Introduction to Web Pages and CGI
CONTENTS
This chapter offers a brief introduction to the HyperText Markup Language (HTML) and the Common Gateway Interface (CGI). The information in this chapter provides the basis for the rest of the chapters about Web pages in this book, especially for the topic of writing CGI scripts in Perl. This chapter assumes that you have a cursory knowledge of what the World Wide Web (WWW) is about and how to use a browser. I also assume you're somewhat familiar with HTML code. Going into more detail about HTML programming would cause us to move too far away from the scope of the book: Perl programming. Therefore, I stick to the very basic HTML elements for text formatting and listing items rather than covering a lot of HTML programming issues. Reading this one chapter won't make you a Webmaster, but you'll learn enough to create Web pages you can subsequently use in conjunction with Perl scripts. With these basics, you'll be able to easily incorporate other HTML page-layout elements in your documents. If you are not familiar with HTML or would like more information, don't worry. There are several documents on the Internet that describe how to write HTML pages. For up-to-date documentation on HTML, conduct a search on the keywords HTMLPrimer and html-primer in the Internet search areas. For more information via printed text books, you might want to consult these titles:
HTML, CGI, and MIMEHTML is the de facto standard language for writing Web pages on the Internet. HTML documents are written as text files and are meant to be interpreted by a Web browser. A Web browser displays the data in HTML pages by reading in the tags around the data. Web browsers reside on client machines, and Web server daemons run on Web servers. The protocol used by Web servers and clients to talk to each other is called the HyperText Transfer Protocol (HTTP). An HTML page contains uniform resource locators (URLs) in addition to the tags. A URL tells the browser where to get certain data. URLs can point to other Web documents, FTP sites, Gopher sites, and even executable programs on the server side. The Common Gateway Interface (CGI) is the standard used to run programs for a client on the server. A Web server gets a request for action from the browser when the user selects the URL. The request is processed by the server by running a program. The program is often referred to as a CGI script because a lot of programs for handling CGI requests are Perl scripts. The results of the CGI script are sent back to the browser making the request. The browser displays the results back to the user. Results can be in plain text, binary data, or HTML documents. The browser reading the output from the CGI script has to know the type of input it is receiving. The type of information is sent back as a multipurpose Internet mail-extension (MIME) header. For example, to send back plain text, you use "Content-Type: text/plain\n\n" at the start of the document. To send back HTML data, you use "Content-type: text/html\n\n".
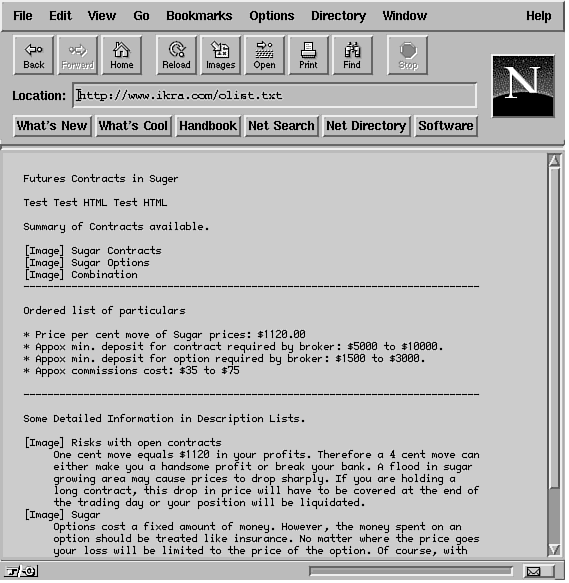
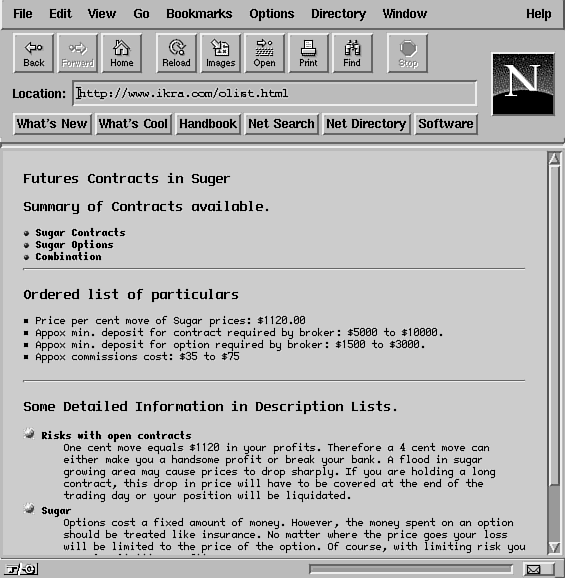
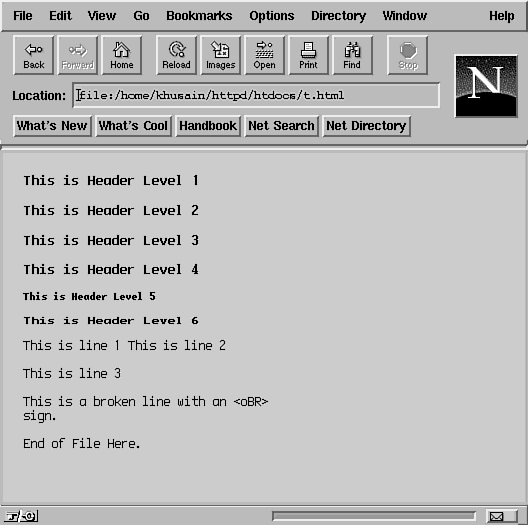
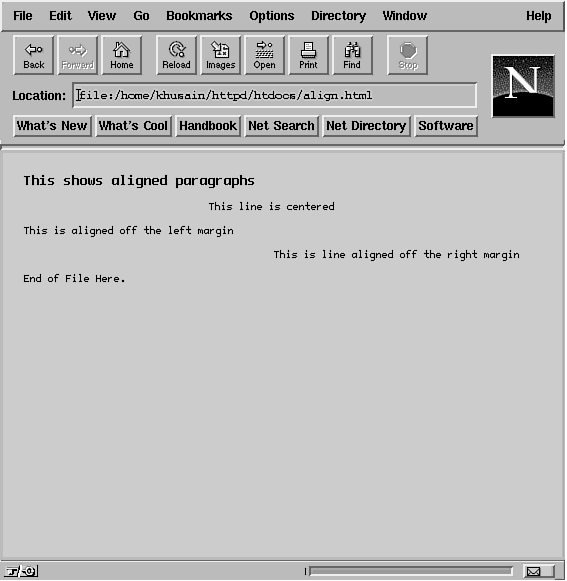
A Simple HTML DocumentAn HTML document uses markup tags to specify special areas of the text. The format of an HTML document is as follows: <HTML> All text for the HTML document is shown between the <HTML> and </HTML> tags. There can be only two pairs of elements, one pair of <BODY> and </BODY> tags to store the text matter for the HTML document, and the other pair of <HEAD> and </HEAD> tags. The <HEAD> and </HEAD> tags show the document title in the heading section of a viewer. The <TITLE> and </TITLE> tags hold the string for text in the title bar for your browser and are the only required element within the <HEAD> and </HEAD> tags. Both the <HEAD> and <TITLE> tags are optional. However, for compatibility with some browsers, you should include them. The <BODY> and </BODY> tags are required in all cases. Most HTML tags are paired. So if you have <HEAD>, then you should have </HEAD>. There are exceptions to this rule. For example, the paragraph tag <P> and the line break <BR> tag are used by themselves and do not require any accompanying </P> or </BR> tags. (The </P> tag is sometimes used to terminate a paragraph, but the </BR> tag does not exist.) Tags are not case sensitive, and any formatting in between the tags is almost always ignored. Therefore, the tag <html> is the same as <HtMl> and <HTML>. It's the presence of <HTML>, <HEAD>, and <BODY> tags in the page that distinguishes an HTML page from a simple text page. Figure 20.1 presents a sample text page which does not have any formatting on it whatsoever being loaded into an HTML browser. Figure 20.1: An unformatted document. All the text shown in Figure 20.1 is aligned in the way that the original text document was set up. In some cases, the text would have been clumped in one long paragraph. Here is the text for the document shown in Figure 20.1: Futures Contracts in Sugar To make the text more presentable, you can add some HTML tags to the document, as shown in Listing 20.1. First, we'll delimit the paragraphs with a <P> tag and then add some headings to it. HTML provides six levels of headings, numbered H1 through H6. H1 is the top-level heading in a document's hierarchy and H6 is the bottom. Generally, you use H2 headers inside H1 headers, H3 headers inside H2 headers, and so on. Do not skip heading levels unless you have a compelling reason to switch heading styles. Use the tags <H1>Text for heading</H1> for defining a heading. A sample HTML page is shown in Listing 20.1. See the output in Figure 20.2. Figure 20.2:Using tags to enhance the appearance of HTML documents. Listing 20.1. Formatted text. 1 <HTML> Your browser will show a different font for each header style. In this listing, we used two heading levels, <H1> and <H2>, lines 5 and 8. The required <TITLE> is also shown and terminated with the </TITLE> keyword in line 1. The <P> tag is used to start a new paragraph in lines 4, 5, and 7, for example. If the <P> tags were not used, the text would follow in one big clump unless you were beginning a new header or a horizontal line with the <HR> tag. See Line 15 where the <HR> tag is used to draw a horizontal line. Look at lines 12 through 14. Using <BR> tags, I have created the list of three items using IMG tags. Note how images are stored and displayed within the document with the <IMG> tag. Basically, the IMG tag specifies where an image will be displayed in the HTML document. The SRC attribute of the IMG tag specifies the URL for the contents of the image. The URL can be a complete (absolute) pathname or a relative pathname. An absolute path would describe the entire URL: http://www.ikra.com/mydirectory/red-ball-small.gif, whereas the relative pathname will assume the default directory for images on the server and pick the image called red-ball-small.gif from that directory. By using image files, you can enhance the appearance of items in a list and provide your own bullets. Consider this reference in line 12: <IMG SRC="red-ball-small.gif"> <B>Sugar Contracts</B><BR> The file red-ball-small.gif is shown next to the text Sugar Contracts using the relative URL scheme. There are several more attributes to an IMG tag allowing you to align text around the image, size the image, provide a mapping of URLs to go to if the user clicks on a section of the image, and so on. Be sure to check the references provided in the "HTML, CGI, and MIME" section for more information on how to use IMG tags. Formatting ListsHTML supports the following types of list formats with which you can show information:
Items in a list are separated by <LI>
tags. The </LI> tag
is not needed to stop one item and start another. In Listing 20.1,
lines 17 to 22 provide an unnumbered list with the use of <UL>
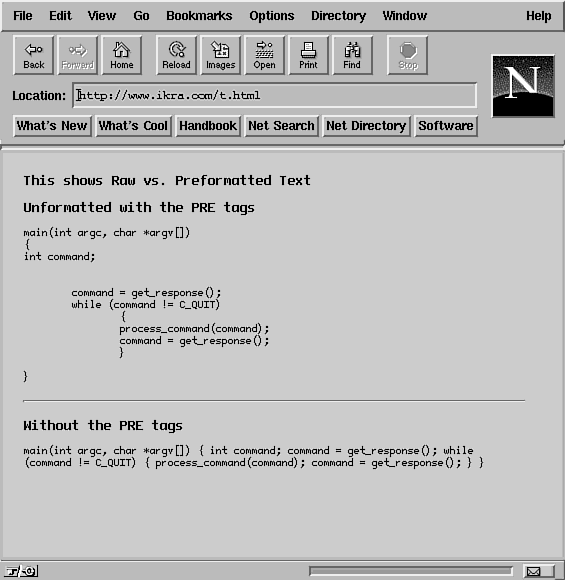
and A definition list has two items: a <DT> tag with a term and the definition of the term with <DD>. The <LI> and <DD> items can contain multiple paragraphs with the use of the <P> tag. Lines 27 through 38 in Listing 20.1 show how to create a simple definitions list. You can even nest lists within lists. Just remember to end each list completely within the list item of the parent list. See the sample HTML code in Listing 20.2. Listing 20.2. Nested lists. 1 <HTML><HEAD><TITLE>Another Lists Example</TITLE></HEAD> The top level numbered list is started at line 5 and ends in line 29. Each item of the numbered list is inserted in lines 6, 13, 19, and 24. Nested lists are shown as unnumbered lists enclosed in <UL> and </UL> tags in lines 8 to 12, 14 to 18, 20 to 23, and 25 to 28. Each <UL> and </UL> pair is terminated in the space for each item in the top level numbered list. Using HTML TagsThe basic set of HTML tags such as the <HEAD>, <BODY>, and <TITLE> are almost always supported by all browsers. However, you should keep in mind that not all tags are supported by all Web browsers. If a browser does not support a tag, it just ignores it. You can emphasize text in the document so that it stands out when displayed by a browser. For example, to underline text, use <U> and </U> to enclose the text. For bold text, enclose the text in <B> and </B> tags. For italics, use <I> and </I>. See the sample HTML code in Listing 20.3. Listing 20.3. Using HTML tags to change font style. 1 <HTML> Line 6 defines a centered line of text with the <Center> and </Center> tags. Note how the <H1> and </H1> tags are enclosed along with the text being centered. Line 7 draws a horizontal line. (Remember that HR stands for Horizontal Rule.) The <b> and </b> tags are used in lines 10 and 11 to embolden some text. Since HTML is case insensitive, we could have used the tags <B> and </B> with no loss of functionality. Use of the <EM> and <STRONG> tags is shown in lines 14 and 15, respectively. Note that the effect of <B> remains in effect until the </B> is seen. So the text being set to a style can be typed in across several lines. In lines 19 through 26, center several lines. In HTML documents you should use <STRONG> and <EM> tags instead of <B> and <I> tags, respectively. There are occasions where using even seemingly innocent tags such as <B> for bolding text or <I> for italicizing text may not work. For example, if a browser is using a font that does not have an italics character set, the <I>text</I> will be printed with its codes; that is, it will be as <I>text</I> and not as text. To take care of some of these issues, should they arise, HTML authors prefer to use the <EM></EM> emphasis tags in place of the <I></I> tags and the <STRONG></STRONG> tags in place of the <B></B>. An HTML document defines only the display style with the use of markup tags. How a Web browser chooses to display the information is left to the implementation at the Web browser. So the client's browser is responsible for rendering this text and may have a completely different font than what you are using to create the page. Therefore, what you see on your screen will be different from what someone else using a different font may see. For best results, try viewing your HTML page with different browsers. The font on someone else's browser might be completely different. For one thing, users can choose whatever font they desire for their browser. Even if users don't explicitly choose a font, the browser may default to a font that is different from the one you use. For example, one user may use the Internet Explorer from Microsoft with a 10-point font, and another user may use Netscape Navigator with a 12-point font. Each user will see different lengths of paragraphs and text layout. Simple text formatting with the use of carriage returns in HTML documents does not work. The client browser will implement word wrapping when it sees text. You can force paragraph and line breaks with the use of <P> or <BR> tags. The <BR> tag creates a line break, and does not start a new paragraph like the <P> tag. A <P> tag may be used to lay out text differently using formats and text alignment on different types of browsers. A <BR> tag simply starts a new line without changing the current paragraph format. Not using these tags causes all white space (including spaces, tabs, and blank lines) to be collapsed into one white space. Listings 20.4 and 20.5 provide samples of two HTML files that produce the same output. Listing 20.4. Headings in HTML files. 1 <HTML><HEAD> Listing 20.5. The second version of the HTML file shown in Listing 20.4. 1 <HTML><HEAD><TITLE>A simple HTML file</TITLE> Figure 20.3 shows the output from both listings. Note how heading-level 1 and heading-level 2 are shown in the same font style in this figure. The example shown here uses Netscape as the browser. The results on your browser might be different because each browser displays HTML in the way it chooses. It's a bit like the contents of a box shifting during transport but the weight of the contents has not changed. Figure 20.3: Using different heading levels. For the sake of readability, it's best to place headings and paragraphs on separate blank lines along with <P> tags. You can also specify formatting options for paragraph alignment in the <P> tag, as illustrated in Listing 20.5. The format specified for <P> will continue until the next <P> tag. To terminate a particular format you can use the </P> tag. Listing 20.6. Aligning paragraphs. 1 <html> The output from this listing is shown in Figure 20.4. Figure 20.4: Using aligned paragraphs. Preformatted TextHaving the browser format text for you does keep you from a lot of the hassle of tracking line breaks, paragraph formatting, and so on. However, when displaying text that is already laid out (such as source code), the default formatting can wreak havoc on your source listings. For this reason, HTML documents have the preformatted (<PRE>) tag. Using the <PRE> tag turns off the HTML formatting at the browser. Listing 20.8 contains an HTML file that illustrates using this tag. The output is shown in Figure 20.5. Figure 20.5: Preformatted text. Listing 20.7. Preformatted text. 1 <html> Special Characters in HTML DocumentsBy now you have seen that the greater than symbol and the less than symbol are used to encode documents. What if you wanted to include them in text that was not in preformatted tags? There are several special characters to encode these special symbols in HTML. In order to include them in a file, you have to enter their codes in the HTML file. Four of the most common special characters in HTML and their codes are
So, to show this string in an HTML page, <HELLO>, you would use the text statement <HELLO> in your code. Note that the semicolon is required in each code. What Is a URL?URL stands for uniform resource locator. Basically, it's an extension of a file name to include the network address of a "thing" file and where that "thing" may be found. The "thing" your URL is pointing to may be a file, directory, database, image, newsgroup, archive, and so on, on a machine that is residing anywhere on the Internet. It's up to the browser to show that data to you. A URL consists of three parts: service://sitename[:port]/path/filename The service part tells you which service you are trying to access. The sitename is the Internet address of the machine where the service is being sought. The port number is optional, because the default is port 80. The path/filename is the location of the file relative to the root directory for the server. The services your browser can offer will vary. Here are the most common types of service you can use with a Web browser:
Here are some examples of URLs:
To specify URL links to other documents, use the anchor tags, <A> and </A>. Anchor tags are used to provide links to other documents as well as provide a location in a document that another HTML document can refer to. Please check the references in this chapter if you are not familiar with using HTML anchors. Here's the format for using anchors for creating links to other documents: <A HREF="URL">Text describing where the URL points to</A> The HREF token specifies the URL to use. The text between the first ending > and the start of </A> is shown by the browser in a different color. The space between <A and HREF is required. Here is a sample hypertext reference in an HTML document. For clarity, I refer to the document that specifies the hyperlink as the first document, and the location to which the URL points as the second document. Let's look at the URL: <A HREF="http://pop.ikra.com/iistv.html">IISTV</A> The browser showing this link will make the word IISTV show up in a different color than regular text and the link is underlined. Clicking on the word IISTV will cause the browser to get the file iistv.html from www.ikra.com. You normally use the absolute pathname of the file in a URL. Pathnames always use the standard UNIX syntax (/), not the DOS syntax (\), for delimiting directory names in a path. Relative pathnames are also possible if the anchor being specified happens to reside in the same directory tree on the same machine as the original document. Use relative links if you are likely to move directories around. Moving the top-level file's location will move the entire tree with it. On the other hand, a full pathname makes an explicit link to the file regardless of where other files are moved to. Anchors can also be used to move to a particular part within the same document. Suppose you want to set a link from one document (index.html) to a section in another document (text.html). Therefore, in the index.html file, define a tag for the topic in the text.html file like this: <A NAME = "Daumesnil">Daumesnil Station</A><P> In the index.html file, you create the anchor to the text.html file with a named anchor. A named anchor uses the name of the file, followed by the hash mark (#) and the location in the file: Get off on <A HREF = "text.html#Daumesnil">the Daumesnil stop</A> Now when the user clicks on the words the Daumesnil stop, the browser loads index.html and goes to the place where the tag is placed for Daumesnil. To go to a location within the same file, skip the filename portion and use only the hash mark with the anchor name. CGI ScriptsA request from a client browser at the Web server is handled by the httpd daemon. If the request is to run a CGI program, the server will run the program for you and return the results of the program back to the client browser. Input to the CGI program being run is sent either via the command line or through environment variables. The CGI program can be in any language, but it has to be able to process input in this way. The output from the program is generally to standard output. Therefore, a CGI program can be a compiled executable, or a Perl, shell, or awk script, and so on. Naturally, because this book is about Perl, the CGI scripts I discuss here will be in Perl. CGI scripts are similar to the scripts you would write to handle the command-line interface but with one glaring exception: You cannot send command-line options to CGI scripts. CGI uses the command line for other purposes, so it's impossible to send arguments to the script via the command line.
CGI uses environment variables to send your CGI program its parameters.
Environment variables are useful in CGI scripts in that any child
processes created by a CGI script also inherit the values of the
parent's environment variables. Some of the main environment variables
used by CGI scripts are listed in Table 20.1. The dagger (†)
indicates that the variable might not be supported on all servers,
so use it with caution.
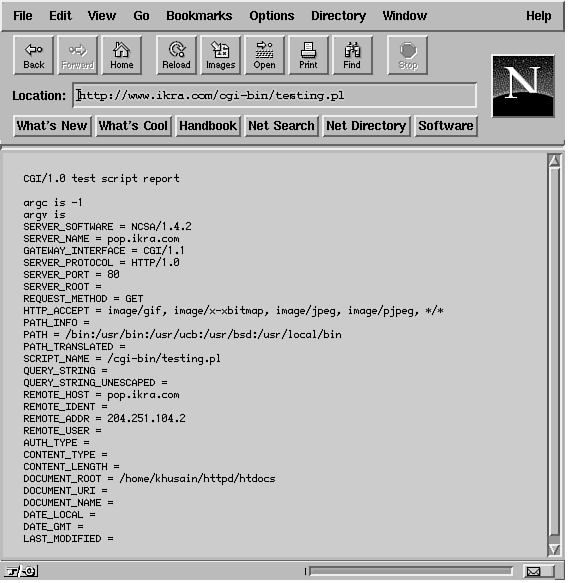
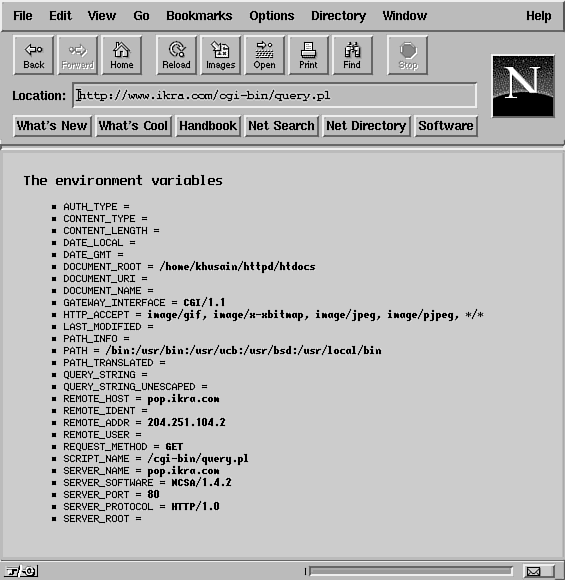
Let's briefly cover some of these environment variables and how your CGI script uses them. Keep in mind that only a few of these variables are guaranteed to be set at any one invocation. Not all of these variables are even set by all servers, so check your documentation (usually a README file of sorts) if you do not have the ncSA server. This book deals with the ncSA server, which pretty much covers most of these variables. To make things easier, you probably will not even use most of the environment variables all the time. The most often used ones tend to be QUERY_STRING, REQUEST_METHOD, and PATH_INFO. However, I cover some of the others just so you are aware of them and what they do. CONTENT_LENGTHThis variable is set to the number of bytes for the attached data to a file. If there is no attached data, this is set to NULL. In Perl, this is interpreted as zero. For example, for a string of "x=10&y=10", the variable is set as CONTENT_LENGTH=9. CONTENT_TYPEThe CONTENT_TYPE variable is set to the type of MIME entity (data) being sent to the CGI script. If there is no data, this variable is set to NULL, as well. The MIME types are defined in HTTP 1.0 (and later versions). With MIME types you can represent different types of data: video, audio, images, or just plain text. Each type of data has its own format: for example, GIF files are in the GIF format, text files are in ASCII, and so on. For a GIF file, the CONTENT_TYPE variable is set as follows: CONTENT_TYPE = image/gif
A client may specify a list of the types of acceptable media in
its request header. This allows the server some flexibility in
how it returns data. Most types of data are registered with the
Internet Assigned Numbers Authority (IANA). The most common registered
types and subtypes are listed in Table 20.2. Subtypes and types
are not case sensitive-so GIF is equivalent to gif.
The types shown in Table 20.2 are by no means complete. Servers may support more types and subtypes. The application type describes transmitted application-specific data. This is generally binary data that is not interpreted by the server. Here is the usual setting for such data: CONTENT_TYPE=application/octet-stream The text type describes textual data. The primary and default subtype is plain. Here is the general setting for this variable: CONTENT_TYPE=text/plain. With the introduction of "rich text" as specified by RFC 1521 it may be necessary to specify the character set being used. RFC 1521 is the Internet standard for defining internet MIME formats. For more information on RFC 1521, check out the HTML page on http://www.cis.ohio-state.edu/htbin/rfc/rfc1521.html. Therefore, the setting for sending a plain text file via CGI would be the following: CONTENT_TYPE=text/plain; charset=us-ascii Note that each content type must be followed by a mandatory blank line as required by HTML/CGI specifications. The image Content-Type can also be used to describe image data. The two well-known image types are JPEG and GIF. The type of format for a GIF would be CONTENT_TYPE=image/gif The video Content-Type describes video data in the MPEG format. For audio, the Content-Type would be in the basic format. In extended subtypes, you'll see an x in front of the subtype. GATEWAY_INTERFACEThis represents the version of the CGI specification to which the server complies. This variable is set for all HTTP requests. PATH_INFOThis variable represents additional path information. It describes a resource to be returned by the CGI application once it has completed its execution. The value of the PATH_INFO variable can be a URL, a string provided to the CGI script, or some other client information. It is up to the handling CGI script as to how to use this information (if the information is needed). If this information is a valid URL, the server may interpret the URL before passing it to the CGI application. QUERY_STRINGThe QUERY_STRING variable is defined as anything that follows the first question mark (?) in a URL. This information can be added either by an ISINDEX document or an HTML form (with the GET action). This string is encoded in the standard URL format of changing spaces to +, individual assignments separated by ampersands and encoding special characters with %XX hexadecimal encoding. You will need to decode the value of QUERY_STRING before you can use it. Assignments to values in an HTML FORM are done in the form x=value. Spaces are converted into plus (+) signs. So an assignment of the form x=hello world, will be converted to x=hello+world. Individual assignments are separated by ampersands (&). The equal (=) sign, the plus (+) sign, and the ampersand (&) may only be included as encoded values (by using the # operator, for example). Therefore, these assignments, x="hello world", "a=2" and "y=I am here", are encoded as this: x=hello+world&a=2&y=I+am+here Input and Output to CGI ScriptsThe server is responsible for packing the data and setting the environment variables before running the CGI script. Information being passed to the CGI script can be passed in one of two ways: as part of STDIN (the Perl handle for standard input) or by setting the value in QUERY_STRING. The results from the execution are sent back from the CGI script to STDOUT (the default output file handle for Perl). When data is passed in via STDIN, the CONTENT_LENGTH and CONTENT_TYPE variables are set to reflect the length and type of data, respectively. This kind of input is the result of the POST method at the client. For the GET method of requesting data, the variable QUERY_STRING is set to the values. Incoming strings take the form of an input string. Assignments to values are done in the form x=value. Spaces are converted into plus (+) signs. Individual assignments are separated by ampersands (&). The equal (=) sign, the plus (+) sign, and the ampersand (&) may only be included as encoded values (by using the # operator, for example). Therefore, two assignments, x=1 and "y=42 and 32", are encoded as this: x=1&y=42+and+32 There is a method to send data to a CGI script with the command line, provided you have the support in the server and your data traffic is not large. Command-line interfaces tend to be restricted by the number of bytes available for the interface. The method of passing data via the environment variables is considered safer and is the preferred way of passing data. A CGI script must always return something back to the client. This is a requirement; otherwise, the client at the other end might hang for a long time. The standard output from the CGI program is the output that the script writes to STDOUT. Output is returned in one of two ways: a nonparsed header output or a parsed header output. In the nonparsed header output, a complete HTTP message is sent back. In the parsed header output, an HTML header and the body of a message is sent with another URL. The latter method is the preferred way of sending data back from a server to a browser. CGI programs can return a number of document types back to the client. The CGI standard specifies what format of data to expect at the server via the MIME header. The most common MIME types are text/html for HTML, and text/plain for straight ASCII text. For example, to send back HTML to the client, your output should look like the example shown here: Content-type: text/html Let's look a test script to see how an HTML file can be sent back. A Test CGI ScriptThe CGI script in Listing 20.8 shows how to display information about the environment variables in use. The best way to learn is by example-and this sample script will show you how to write a very basic CGI script in Perl. Listing 20.8. A sample test script. 1 #!/usr/bin/perl Line 3 forces the data written to STDOUT (the default) to be sent back to the client immediately. Make it a habit to do this is for all your CGI scripts. Flushing the output is necessary when processing large amounts of data, because the inherent caching on the output buffer may delay the transfer of text from the one shown. Line 4 returns the MIME type of document back to the client. Note the two carriage returns at the end of the print statement. The client expects an extra blank line. Line 5 simply prints an output header for the text output. Line 6 checks if the input is coming from the standard input (STDIN) or if it should be gathered from the command line. The command-line parsing is shown only for use in this example. In Chapter 22, "Using HTML FORMs," and Chapter 23, "HTML with Perl Modules," I develop a Perl subroutine to handle this input via the HTML FORMS. Keep in mind that the command-line interface is restrictive when large amounts of data are being passed through. For the moment, this example shows how the input is set in $ARGC and the @ARGV array. Lines 7 and 8 extract the input stream from <STDIN>, whereas lines 11 through 14 extract incoming arguments from the command-line interface. The rest of the script echoes the values of the environment variables set at the time the shell script is executed. Let's look at the variables in the output shown in Figure 20.6. Note that the output is in text. Figure 20.6: Environment variables from the test script. The output in Figure 20.6 does not look very pretty does it? We can send back an HTML document, too. Look at Listing 20.9, where we send back an HTML document. In this listing, the content type is set to "text/HTML" because we are sending back an HTML document. The rest of the script is basically echoing an HTML document back to the client. Listing 20.9. Echo environment variables with HTML output. 1 #!/usr/bin/perl The output is shown in Figure 20.7. I cover sending and receiving data using these environment variables using Perl in Chapters 22 and 23 in greater detail. Figure 20.7: HTML equivalent output from Listing 20.9. Using FramesThe Netscape browser allows you to use frames to define scrollable portions on your screen, as illustrated in Figure 20.8. The main file for this page is shown in Listing 20.10. Figure 20.8: Using HTML FRAME tags. For more information on frames, look at the Web site for Netscape, the folks who came up with frames, at this address: http://www.netscape.com/assist/net_sites/frames.html Listing 20.10. Using FRAMEs. 1 <HTML><HEAD><TITLE>Kamran's Home Page </TITLE> The names of the two FRAMEs in Listing 20.10 are set as TOPICS and INDEX. The area that these tags use up on the screen in specified in the FRAMESET tags. The ROWS attribute of the FRAMESET specifies the percentage of screen space that is to be used when rendering each page. For example, the line <FRAMESET ROWS="22%,78%"> sets aside 22% of the top of the screen for the first frame to be laid out and 78% for the other frame. Had we used COLS instead of ROWS in the specification, like this: <FRAMESET COLS="22%,78%"> we would be specifying 22% of the screen space for the first frame and 78% for the second frame. More than one frame can be specified as long as the sum of all the percentages assigned for spaces add up to 100. For example, to set aside three columnar spaces on a screen, you could use the following line: <FRAMESET COLS="22%,22%,*"> The first two frames would be given a column whose width is 22% each of the total space available. The asterisk in the third column's space indicates to the browser to use the rest of the available space for the third column. Also, like lists, frames can be nested within other frames by nesting a <FRAMESET></FRAMESET> tag pair in other FRAMESET tags. For more information on using FRAMES, check out the reference books listed earlier in this chapter. In Listing 20.10, the TOPICS frame occupies the 22% top area, and the INDEX frame occupies the bottom 78%. The URLs in the INDEX frame use the name TOPICS of the window and the TARGET option to display text in the TOPICS window frame. See Listing 20.11. Listing 20.11. Using TARGET in FRAMEs. 1 <HTML> The TARGET attribute sets the frame that will be used to lay out the contents of what the HREF attribute points to. When you click on any of the links defined in the top row of the HTML page, the contents of the URL are laid out in the bottom frame. Therefore, the top serves as a table of contents, and the bottom serves as the viewing area for the HTML page. SummaryThis chapter has been a whirlwind introduction to writing HTML pages and interfacing with CGI scripts. A book devoted to these topics would probably give you more detailed information. However, you now have enough information to start writing your own Web pages. In Chapters 22 and 23 I cover how to use HTML tables and forms with Perl CGI scripts. CGI scripts are the workhorse behind the HTML pages. Input is sent from a client via a server to a CGI script and replies are expected back even if commands are not successful. Replies can take the form of text, data, images, HTML pages, and so on. Output from the CGI script is sent to its standard output and is passed back to the client via the server. Arguments to CGI scripts are passed via environment variables because this is an easy way to pass values between child and parent processes. CGI scripts do not have to be written in Perl, but it's easier to manipulate strings in Perl than it is in C or other languages.
|
||||||||||||||||||||||||||||||||||||||||||||||||||||||||||||||||||||||||||||||||||||||||||||||||||||
|
With any suggestions or questions please feel free to contact us | |||||||||||||||||||||||||||||||||||||||||||||||||||||||||||||||||||||||||||||||||||||||||||||||||||||