|
Plug-ins; description and functionIn this chapter we'll take a walk down the Filters menu, and see what kind of goodies are hidden there. Distorts plug-ins
This plug-in places a lens (bulb) on top of your image. If you keep the original surrounding it will look like you have placed a crystal ball over your image. If you set the surrounding to background color you will get the background color from the toolbox to surround the ball, transparent surroundings will be transparent of course (nice surrealistic button for webpages). The Lens reflection index controls how "fisheyed" the lens will be, higher values will be more fishy.
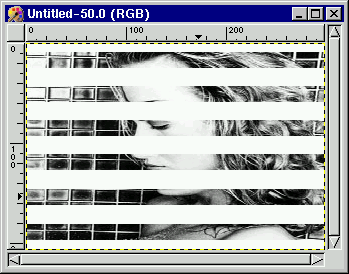
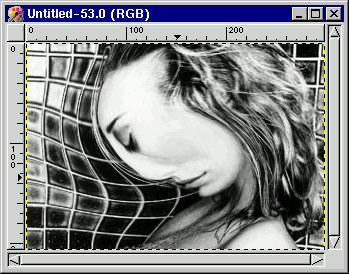
This Plug-in truly makes blinds of your picture. It's like slicing your picture in shreds and pasting the slices to the blind itself. To enable transparent background behind your blinds, you have to work in layers, otherwise you'll just get the background color in the toolbox. You can create both vertical and horizontal blinds, just check the right button. Displacement refers to the angle of the blind. Zero makes the blind shut the window and if you set it to 90, you will get full sunshine. DisplaceThis filter is a general distort filter, which can be used for nearly all kinds of distortion. You can for example use it to whirl, pitch, shift, spread or melt your image. I will try to give you a short introduction to the hidden secrets of this filter. It is clear that this filter will displace an image or part of an image, the question is how? To put it simple, the Displace filter needs a displacement map to tell it how to distort the image. The brightness or darkness values in this map controls how Displace moves the image pixels. To make displacement easy, always use grayscale images as maps. It will work with colored images too, but as displacement depends on the brightness/darkness of the map, the color information is simply not used.
As we know from earlier chapters, you can use 256 shades of gray in a grayscale image. How bright or dark a gray "color" is, depends on the Intensity value, which goes from 1 (black) to 256 (white). In the middle of this range we find "medium gray" with a value of 128. One of the fundamental parts of displacement is that the "dark values" 0 to 127 will be displaced in one direction, the "medium gray" value 128 will not be displaced at all, and the "light values" 129 to 256 will be displaced in the opposite direction of the "dark values". To make thing easier we can put this range in a new perspective. If you think of -128 as total darkness, and 0 as "medium gray" and +128 as total lightness, it becomes more clear that dispacement will go in different directions, since we have negative and positive intensity in our map. The maximum displacement in either direction happens where the map has a value of either (-128) or (+128).
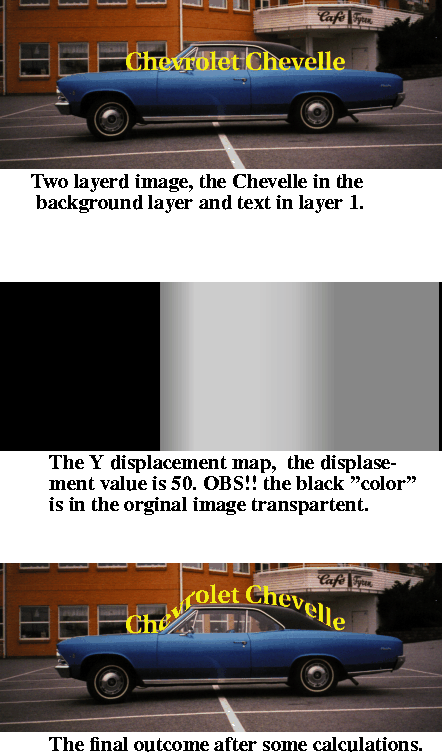
Now, bring up the Displacement plugin from the image which is going to be displaced. Uncheck "Y" and make sure that "X" is checked and check Black. Set the X displacement to 50, and bring up the map image. Fill the map with white (+128), choose the name of the map image in the displacement dialog, and press OK. The image has now been displaced 50 pixels to the left (pic. X).
The above is also true for Y direction displacement, you just have to switch left to top and black to bottom.
Now we move to more complex displacement. As you see in the dialog box, you can displace in both X and Y direction. This means that you can e.g. displace the image a bit to the bottom left corner. To achieve this, you have to make two maps, one white and one black. Map the black one to Y and the white one to X. Your image will now be displaced toward the bottom left corner.
I said earlier that you can achieve any kind of distortment with this plugin, so I will try to give you an example: Spread horisontal: Create a map made of horizontal black, white and gray stripes. The different intensity in the stripes will make the displaced image look as if you have spread it in horizontal ribbons. You have to exeriment by yourself to figure out what you can do, but trust me - you can do a lot with this plugin. The obvious thing is to bend text over something circular, e.g a terrestrial globe. To achieve that, you'll have to create a suitable gradient (dark in both ends and light in the middle) with the Gradient Editor.
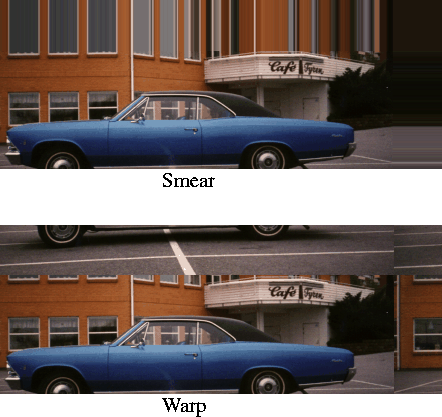
Here is some additional information. Sometimes it's hard to create the kind of map you want, for example when you only want to displace part of your image. When you experiment with different maps, you'll often want to darken/lighten them, but this will inevitably alter the "medium gray" value. The perfect 0 will be transformed to something which will displace your image. The way to come around this problem is to make the static parts of your map transparant, because fully transparent pixels are considered to have a value of 0. Black pixels which are (almost) transparant are considered to have a value of a bit under 0, or somewhere around (-5). The same goes for white, but they will get a positive value around (+5), so Alpha values should play a very important part in your map making. What's the difference between Black, Smear and Wrap ? Say that you're using a white map, a displace value of 50, and that you only want to displace in the X direction. When the image is displaced 50 pixels to the left, there will be 50 pixels missing at the right side of the image. If you have checked Black, a black color will fill this part for you. If you have pressed Smear, those 50 pixels will be stretched from the right part of the image (pic X). If you have pressed Wrap, the 50 pixels you pushed out of the frame at the left side, will appear at the right side of the image to cover for the missing pixels.
Here's an example to calculate where a pixel will end up. Let's choose a pixel which is positioned at 50(x)and 50(y) in the image coordinate system.We go to our maps and check the Intensity value of the equivalent pixel in that position. In this case we presume that the Intensity value we got from map X (the horizontal displacement map), was 230, which means (230 -128 )= 102 in the displacement range. Map Y (the vertical displacement map) had an Intensity value of 55, which means (55-128) = (-73 ) in the displacement range. We also choose a displacement value of 50 for X, and 30 for Y. If we put these values in our algoritm.
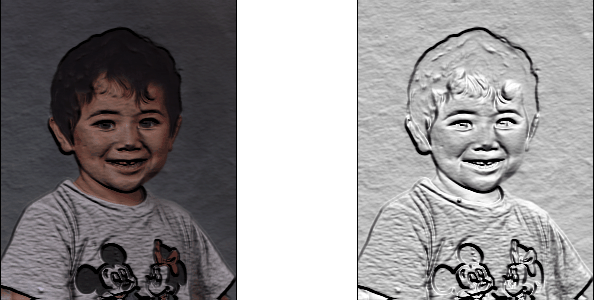
These calculations tell us that our pixel will end up at x=10 and y=67, i.e. the pixel will be moved a bit closer to the bottom left corner. EmbossStamps or carves out a 3D look to your image. Emboss works only on RGB images. Emboss may seem quite easy to grasp, but if you want to have total control over this filter, it's a bit tougher. The Azimuth slide determines light direction, but so does Elevation. The most exact way to describe Azimuth is as "from which direction the sun rises in the morning". Think of Azimuth as a shining satellite, moving around your image - the light in the image will change as it moves. If we thought of Azimuth as the sun in the morning, you might think of Elevation as the "time of the day". Think of the sun when it reaches zenith. There will be no shadow. It's the same with Elevation, and if your depth is big, the lowest parts will look like black holes (quite good edge detect). When the sun falls or rises, the shadows will get longer or shorter, and the direction of the shadows will also change. The direction of the "stamp" (inwards or outwards) is determined by the original brightness value, bright parts will look like they are raised, dark parts will look like they are carved. Depth determinates the depth of your Emboss or Bumpmap. As you may have noticed, Emboss will make your image gray. Bumpmap keeps the color information, but the "carving" will not appear as deep as with Emboss. The images below have been embossed respectively bumpmapped with the same values, so you can see the difference. Emboss makes a surface look like metal or rock. Bumpmap just puts more depth to your image, like an impression on paper or leather..
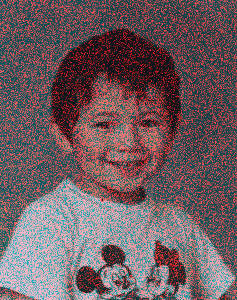
Noisify adds random noise to an image at a scale going from 0 - no noise to 1 - full noise level. You can add noise independently to each RGB channel. Channel #0 is red (or gray in a grayscale image). Channel #1 is green (or gray alpha in a grayscaled image). Channel #3 is blue. This filter will not work with indexed images. If you have used a lot of "Sharpen"to fix an unfocused photo, you can add a little noise to it to make it look more natural. Randomize
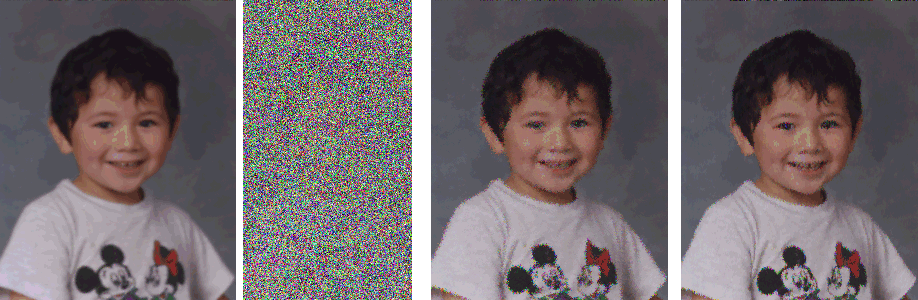
Blurring, which will blur your image. For each pixel a random number is picked. A pixel will be blurred if the random number is in the range of the randomize percent determined by you. It's the same for the other modes of randomizing. Seed: You can set the random seed to the current time, or you can set it your self in the input field. Hurling will change the pixel to a random color, if it's in the range of randomization. Picking will pick a random neighbor pixel. Slurring will distort you image downwards. If a pixel is determined to be slurred it's an 80% chance that the pixel straight above is used, otherwise a random neighbor above is used. All the modes are working with all kinds of images, with the exception of Blur, which only works with RGB and grayscaled images. A warning is in place for Hurling since a too high value, or if you repeat it to many times will get you an unrecognizable image. Below represents from from the left: Blur, Hurl, Pick and Slur all with 50 in rand. and 3 in repeat.
This plug-in also displaces the image, but it's a lot easier to understand. You can displace the image in Sine or Sawtooth wave form. You can also decide the Period and Amplitude of the wave. Wrap, Smear and Black have the same functions as in the Displace plug-in. If you unchecked antialiasing you will get rough edges. You can ripple both horisontally and vertically.
It will displace each row horizontally or vertically. Depending upon your choice, it will displace it randomly. Shift amount refers to how much you want a row displaced. You can't predict if it will displace left or right / up or down. You just know the amount of displacement.
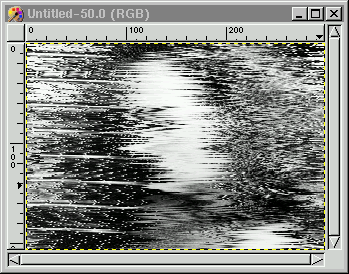
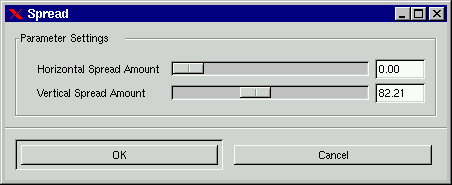
This plug-in spreads the pixels in your image. It moves the pixel to a random location. This location will be in the range of your setting in the slidebars. This makes it possible to spread the image vertically, horizontally or in both directions.
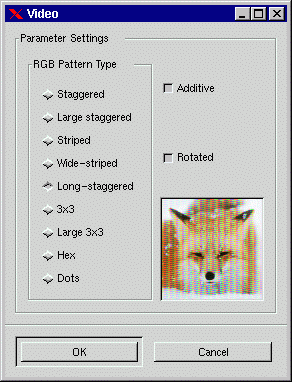
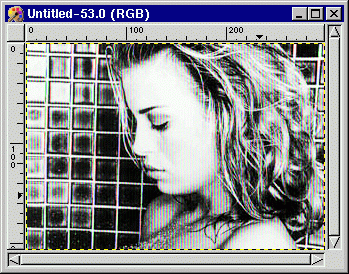
This plug-in will let you believe that the image is a ordinary low-res/dot pitch video monitor. You can achieve this with different patterns, which means that you can create a whole lot of "bad monitors". By default the pattern is horizontal, but you can by checking "rotated" let it be vertical instead. For an explanation of Additive see the Modes chapter, in short use it to get a realistic look. If you don't use Additive, the pattern will just get on top of the image and darken it a lot.
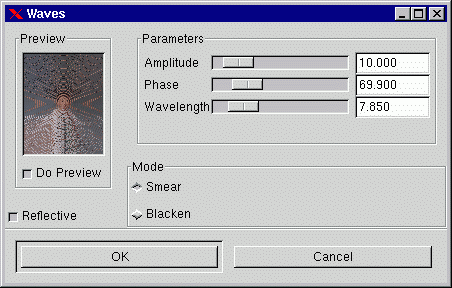
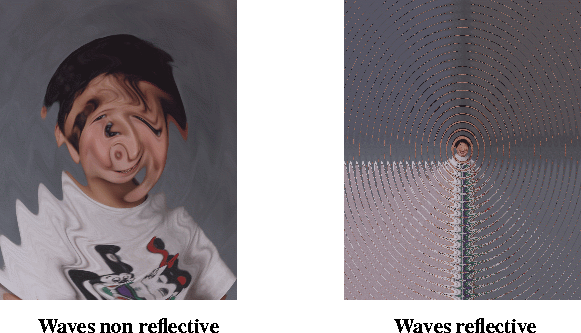
This plug-in is really nice. It simulates the effect that you get when you throw a stone in a pond (if you have unchecked the reflective button). The amplitude is the height of your waves. Phase is where you are in your wave (Waves work like a sinus wave and the phase is where you are in that sinus wave). Wavelength is how long your (sinus)wave is. The modes Smear and Blacken have the same function as in the displace plug-in. If you check the Reflective button you will not get the "throw stone" effect. Instead your wave will interfere with the original image.
This plug-in will distort your image in a centre circular way. Whirling distorts it much like the little whirlpool that appears when you emty your bath. Pinch can be compared to if you had applied your image to a soft rubber surface. If the pinch slide bar has a negative value, it will look as if someone had tried to push a round object up toward you from behind the rubber skin. If you use a positive value, it looks like someone drags or sucks in the surface from behind, and away from you. The slidebare for Whirl controls how many degrees you want to "turn" your image. The Pinch slide bar controls the type and amount of pinch. Radius determines how much of your image will be affected. If you set radius to "2" , the whole image will be affected. If you set the radius to "1", half the image will be affected, and if it is zero nothing will be affected (just think of it as the radius in a circle. 0 in the center and 1 half way out .......). To create a really realistic whirlpool of your image, combine the two distort methods
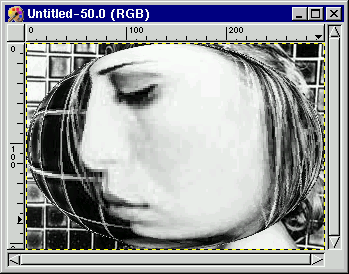
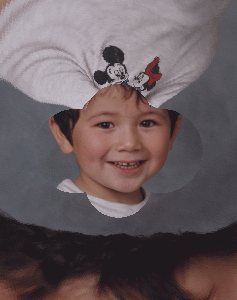
This plugin together with Central Reflection can best be described by making a parallel to funny mirrors in an amusement park. If we assume that the image you're working on is a picture of you, it's like having a conical/tube mirror, which you are looking into from the bottom. What you see is a highly distorted image, and that's what happens with your image. Naturally, since you are looking into the mirror-tube, you can't see yourself undistorted, but if you check "Keep original surroundings " you will be able to see yourself in the middle looking into the mirror. You have a bunch of settings in this filter. The most important ones are: Radius and Base angle, which control the shape of the cone/tube (there is no base angle in Central Reflection since it is a tube). Radius determines the size of the circular bottom of the cone/tube is in pixels. Base angle refers to how steep the cone is. The image is flipped vertically by default, to make the image easier to understand. If you uncheck "Flip image vertically" , you will see what you would see if you were really looking into such a mirror, but this is probally not what you want - it looks very weird. We recommend to use Antialias to prevent the image from getting "jaggy". Please see pictures below to get a grip of how the filters works. The radius is the diameter of the circles in pixels. Using Initializing is recommended, because then you will get a much smoother image. Coordinate Map:This filter does the same as the Displace filter. The creator of this filter writes that this is easier to use, and maybe he's right, you will have to try it for yourself. There is one limitation though, it will only work with 256x256 pixel images. Here is how it works: The plug-in will try to map two images, (one in X direction, and one in Y direction) on an original image. The original image will get the architecture from the map images. See pictures and displace plug-in. You can't specify the offset (just as in the Displace filter).
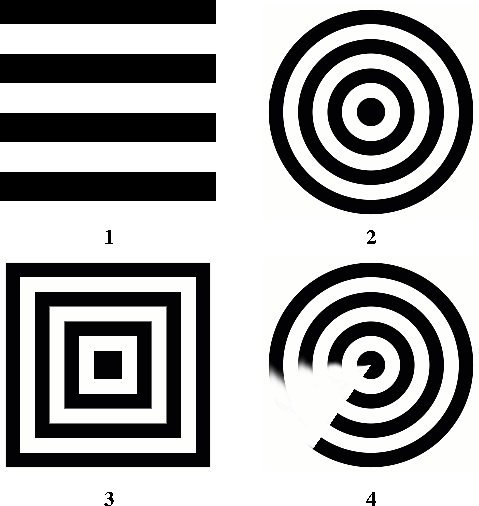
The main achievment of this plug-in is to make circular or rectagular shapes of your image or drawable. You can use a text string, and when you then apply this plug-in, it will get (very) curved. You can also make a target circle out of some lines. Or you can make rectangles out of straight lines (pict 1). The slide "Circle depth in percent" controls how round your circle will be. A higher value will make it more circular (pict 2), a lower value makes it more rectagular (pict 3). The "Offset angle" controls where your circle/half circle will start (in degrees) (pict4)
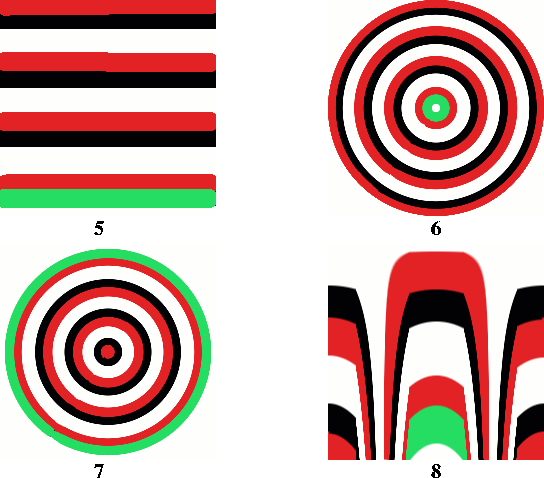
The slide "Map from top" decides if the bottom (pict 5) of the image turns up in the middle or not. Low values puts it in the middle (pict 6), high values puts it in the outer regions (pict 7). "Map backwards ?" controls whether the image will be mirrored or not. "Polar to rectangular?" lets you decide whether the image should be mapped to circular or rectangular. Low values will make it map to rectangular (pict 8). The slides "Map ....." , "Map ...." and "Polar ....." all have a breeching point which lets them flip from one behaviour to another..
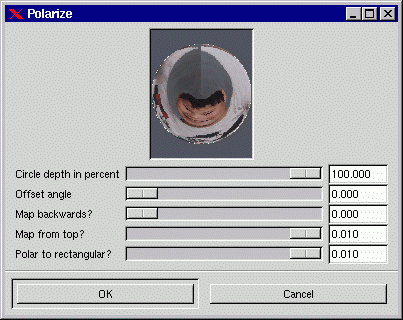
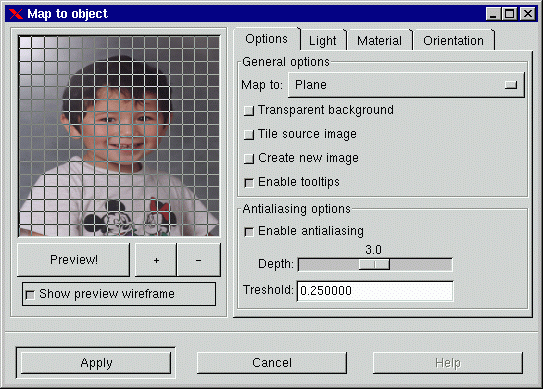
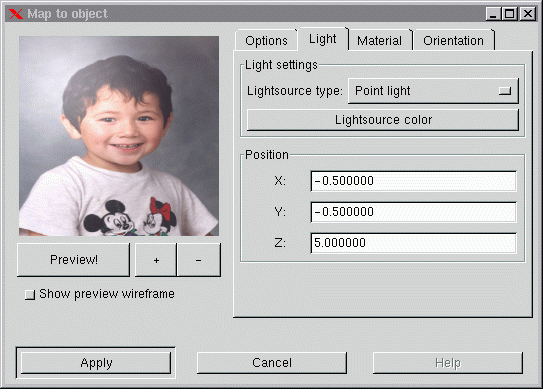
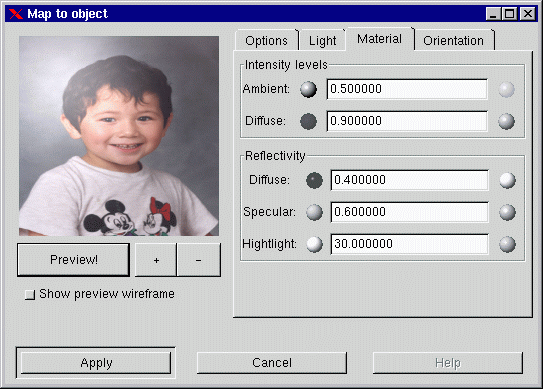
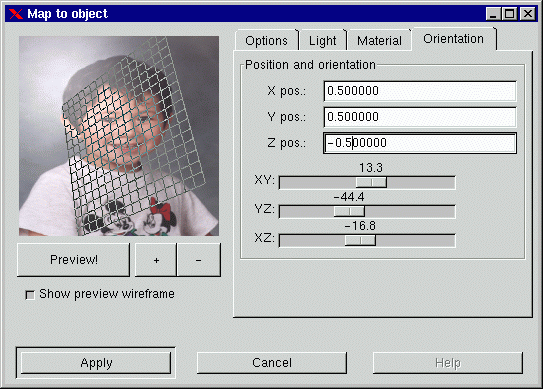
Value Propagate:Encript/Decript:This plugin makes it possible to encript your images, so no one besides yourself can see them. To Encript the image, simply bring up the filter and type your pass"number" e.g. 6543 (must be a numerical integer), to decript, simply bring up the filter again and type your pass"number" and the image will get decripted. A warning by the author of this filter, Daniel Cotting; this filter may work for you but there are no guarantees (for us at Frozenriver, this filter has been a bit buggy, not in the way that we have lost any images, but it sometimes does not encript the image). Remember not to save the image in a destructive file format, e.g JPEG. Map Object:This filter will map your image to a sphere or a plane. You can also set different lighting effects on the mapping object to make it even more convincing. You can even set how different "materials" will appear in your sphere or plane. This is a very nice plugin for creating 3D-effects in Gimp. You can for example create a perfect football (soccer, not american). There are of course many more applications for this excellent plugin, the only limit is your imagination.
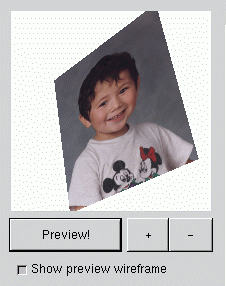
Options: You can choose if you want to map to a plane or to a sphere. Checking "Transparant background" results in a transparent surrounding around your sphere or plane. Tile Source Image means that the plane or sphere will be repeated or tiled, where it would otherwise end. E.g if you map to a plane and this plane is tilted in some direction, there will be alot of "space" around your output image. Instead of having this space filled by a background color or transparancy, the plane will tile itself where it ends (see pic X). "Create new image" lets you spare the original image. Instead it creates a duplicate image, where the filter takes effect. "Enable tooltips" is is a nice option when you get to know the filter, here's a chance to turn it off when you already know what it says. Antialiasing: Here can you turn antialiasing on or off, we recommend to use it, otherwise the images will be quite useless (there can of course be moments when a non-antialiased image can be useful). Depth refers to how much antialiasing you want , the higher the value,the better the antialiasing , but it will also be conceivably slower. Threshold determines the limit of antialiasing, the process is interrupted when the difference between pixels is lower than the value in the input field.
Edge detect plug-ins[Top] [Prev] [Next] [Bottom] karin@frozenriver.ale.se Copyright © 1997, Karin Kylander |
|||||||||||||||||
|
With any suggestions or questions please feel free to contact us | ||||||||||||||||||